Overview
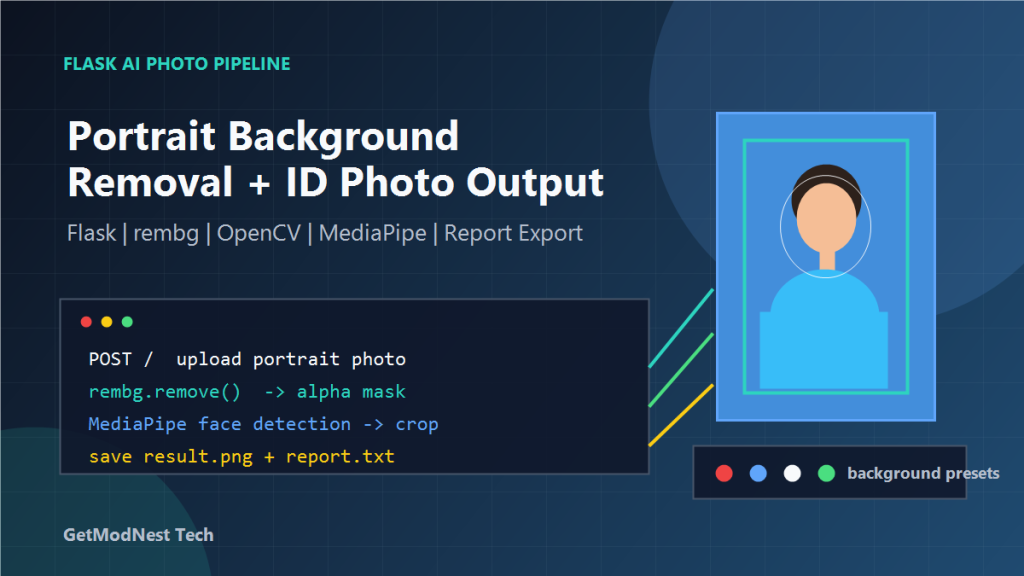
This article documents an AI portrait photo tool with processing pipeline that uses image models for background removal, alpha matting, face detection, portrait enhancement, ID photo generation, and report output in a Flask web application.
This type of system is useful for ID photo generation, resume photo preparation, portrait preprocessing, and internal image automation tools.
Project Goal
The system is designed as a one-click portrait photo processing web application.
- upload a portrait photo from a browser
- automatically process the image after upload
- support background removal and background color replacement
- keep the portrait edge natural and clean
- generate processed images for preview and download
- generate a processing or detection report
- avoid filename conflicts when multiple images are uploaded
- keep source images and output images in separate directories
open web page -> select image -> choose background color -> submit -> preview result -> download resultTechnology Stack
Backend: Flask
Image processing: OpenCV + NumPy + Pillow
Background removal: rembg or RMBG model
Face detection: MediaPipe Face Detection
Portrait enhancement: CodeFormer or GFPGAN, optional
Frontend: Jinja2 templates + CSS + JavaScript
Runtime: Python virtual environment
For the first working version, start with:
Flask + Pillow + OpenCV + rembgThen add face detection, matting refinement, crop rules, and enhancement step by step.
Suggested Project Structure
portrait-photo-app/
  app.py
  pipeline.py
  templates/
    index.html
  static/
    style.css
  temp/
    upload/
    output/
  models/
    codeformer/
gfpgan/app.py: Flask routes, upload handling, preview, download, and source-image accesspipeline.py: core image processing pipelinetemplates/index.html: upload form and result display pagestatic/style.css: page layout and visual styletemp/upload: uploaded original imagestemp/output: generated output images and reportsmodels: optional enhancement models such as CodeFormer or GFPGAN
Backend Route Design
GET  /                         show upload page and recent results
POST /                         upload image and start processing
GET  /preview/<filename>        preview processed image
GET  /download/<filename>       download processed image or report
GET  /source/<filename>         preview original uploaded image
The upload route should receive the file, validate it, generate a unique filename, save the source image, call the processing pipeline, save outputs, and return result links to the page.
original: temp/upload/<uuid>_source.png
result:   temp/output/<uuid>_result.png
report:   temp/output/<uuid>_report.txt
Image Processing Pipeline
The core pipeline can be designed as:
process_id_photo(input_path, output_dir, options) -> result objectThe result object should include processed image path, source image path, report path, detected face status, selected background color, and warning messages.
Step 1: Read the Image
from PIL import Image

image = Image.open(input_path).convert("RGB")
Common checks include whether the file exists, whether it can be opened as an image, whether the size is large enough, and whether the image is corrupted.
Step 2: Remove Background
from rembg import remove

rgba_image = remove(image)
The output is usually an RGBA image with an alpha channel. If a stronger portrait matting model is available, birefnet-general-use or another RMBG model can be used instead.
Step 3: Refine the Foreground Edge
Raw background removal may leave noisy edges around hair, shoulders, and clothes. Useful operations include alpha mask smoothing, morphological open and close operations, edge feathering, GrabCut refinement, and small background island removal.
The goal is not to make the edge too hard. A slightly soft transition often looks more natural.
Step 4: Replace Background Color
standard red:  (200, 30, 35)
standard blue: (67, 142, 219)
white:         (255, 255, 255)
gray:          (240, 240, 240)
The frontend can use radio buttons or preset color buttons. Compositing should use alpha blending:
output = foreground * alpha + background * (1 - alpha)Step 5: Detect Face and Locate Portrait
Face detection can be added with MediaPipe Face Detection. The detected face box helps decide whether a face exists, whether the portrait is too small or too large, where the head center is, how to crop the final image, and whether the face is close to the edge.
If no face is detected, the pipeline should still save a result but include a warning in the report.
Step 6: Crop to ID Photo Composition
1 inch: 295 x 413 px
small 2 inch: 413 x 531 px
passport-like ratio: 35 x 45 mm
For a web prototype, use a simple target size first:
target size: 413 x 531 px- keep the face horizontally centered
- leave enough top margin above the hair
- keep shoulders visible
- avoid cutting the chin or head
- crop first, resize after crop
Step 7: Portrait Enhancement
CodeFormer
GFPGAN
light sharpening
brightness and contrast adjustment
skin tone smoothing
For production use, enhancement should be conservative. Over-enhancement may cause unnatural skin texture or identity changes.
Step 8: Generate the Processing Report
source file name
output file name
image size before processing
image size after processing
selected background color
face detected: yes/no
warnings
processing time
Example:
Input: demo.jpg
Output: 8f2c_result.png
Background: standard blue
Face detected: yes
Final size: 413 x 531
Warnings: none
Frontend Page Design
The frontend can be a single-page form. The left side can contain the upload area, background color options, and submit button. The right side can contain result preview, source preview, and download buttons.
waiting for upload
processing
success
failed with error message
For a local tool, plain Jinja2 and CSS are enough. JavaScript can be added later for asynchronous upload and progress display.
Minimal Flask Route Example
from flask import Flask, render_template, request, send_from_directory
from pathlib import Path
from uuid import uuid4

from pipeline import process_id_photo

app = Flask(__name__)
UPLOAD_DIR = Path("temp/upload")
OUTPUT_DIR = Path("temp/output")
UPLOAD_DIR.mkdir(parents=True, exist_ok=True)
OUTPUT_DIR.mkdir(parents=True, exist_ok=True)

@app.route("/", methods=["GET", "POST"])
def index():
    result = None
    if request.method == "POST":
        file = request.files.get("photo")
        color = request.form.get("background", "blue")
        if file and file.filename:
            job_id = uuid4().hex
            source_path = UPLOAD_DIR / f"{job_id}_source.png"
            file.save(source_path)
            result = process_id_photo(source_path, OUTPUT_DIR, {"background": color})
    return render_template("index.html", result=result)

@app.route("/preview/<path:filename>")
def preview(filename):
    return send_from_directory(OUTPUT_DIR, filename)

@app.route("/download/<path:filename>")
def download(filename):
    return send_from_directory(OUTPUT_DIR, filename, as_attachment=True)
Minimal Pipeline Example
from pathlib import Path
from PIL import Image
from rembg import remove

BACKGROUND_COLORS = {
    "red": (200, 30, 35),
    "blue": (67, 142, 219),
    "white": (255, 255, 255),
    "gray": (240, 240, 240),
}

def process_id_photo(source_path, output_dir, options):
    output_dir = Path(output_dir)
    background_name = options.get("background", "blue")
    background_color = BACKGROUND_COLORS.get(background_name, BACKGROUND_COLORS["blue"])

    image = Image.open(source_path).convert("RGB")
    rgba = remove(image).convert("RGBA")

    background = Image.new("RGBA", rgba.size, background_color + (255,))
    composed = Image.alpha_composite(background, rgba).convert("RGB")
    composed = composed.resize((413, 531), Image.LANCZOS)

    output_name = f"{Path(source_path).stem}_result.png"
    report_name = f"{Path(source_path).stem}_report.txt"
    output_path = output_dir / output_name
    report_path = output_dir / report_name

    composed.save(output_path)
    report_path.write_text(
        f"Input: {source_path}\nOutput: {output_path}\nBackground: {background_name}\n",
        encoding="utf-8",
    )

    return {"output": output_name, "report": report_name, "background": background_name}
Recommended Implementation Order
- complete Flask upload and static page
- save uploaded source image
- call the processing function and return a result
- implement background removal
- implement background color replacement
- add face detection and report warnings
- add crop and resize rules
- add alpha edge refinement
- add optional portrait enhancement
- improve frontend result preview and download buttons
Common Problems and Fixes
Uploaded File Cannot Be Opened
Check file extension, content type, and whether the browser form uses enctype="multipart/form-data".
Output Image Has White or Black Edge
This usually comes from a rough alpha channel. Add alpha smoothing, edge feathering, or matting refinement.
Face Detection Fails
Possible reasons include dark image, small face, side face, blurry photo, or incomplete head area. The system should generate a warning instead of failing silently.
Background Color Looks Unnatural
Use standard RGB values and make sure compositing uses alpha blending instead of direct pixel replacement.
Result Size Is Wrong
Always crop first and resize after cropping. If resizing is done too early, the portrait position may become hard to control.
Deployment Notes
python -m venv venv
venv\Scripts\activate
pip install flask pillow opencv-python numpy rembg mediapipe
python app.py
For Linux deployment, use a virtual environment or Docker. If deep enhancement models are used, GPU, CUDA, PyTorch version, and model weight paths should be checked carefully.
FAQ
What is an AI portrait photo tool?
An AI portrait photo tool uses image models and computer vision steps to process portrait photos, remove backgrounds, detect faces, refine edges, replace background colors, and generate usable photo outputs.
Can AI remove the background from portrait photos?
Yes. AI background removal models can separate the person from the background and generate an alpha mask for clean background replacement.
Can this workflow be used for ID photos?
Yes. The pipeline can be extended with face detection, crop rules, fixed output sizes, and standard background colors for ID photo generation.
Can this tool process resume photos?
Yes. The same workflow can be used to clean portrait backgrounds, adjust composition, and generate professional-looking resume photos.
Why use Flask for an AI portrait photo tool?
Flask provides a simple web interface for uploading images, running the AI processing pipeline, previewing results, downloading outputs, and generating processing reports.
Final Conclusion
A Flask portrait photo processing system can be built in small, stable layers. The first milestone is not a perfect AI result, but a reliable web workflow: upload, process, preview, and download.
After that workflow is stable, background matting, face detection, cropping rules, and portrait enhancement can be improved independently.
Flask upload flow first, AI quality second, UI polish thirdNeed Help Building an AI Photo Tool?
This note is based on a practical AI image processing workflow. If you need a custom AI portrait photo tool, ID photo generator, resume photo processing system, background removal workflow, or Flask-based image processing web app, GetModNest can help with practical development and deployment.
Email: info@getmodnest.com