Overview
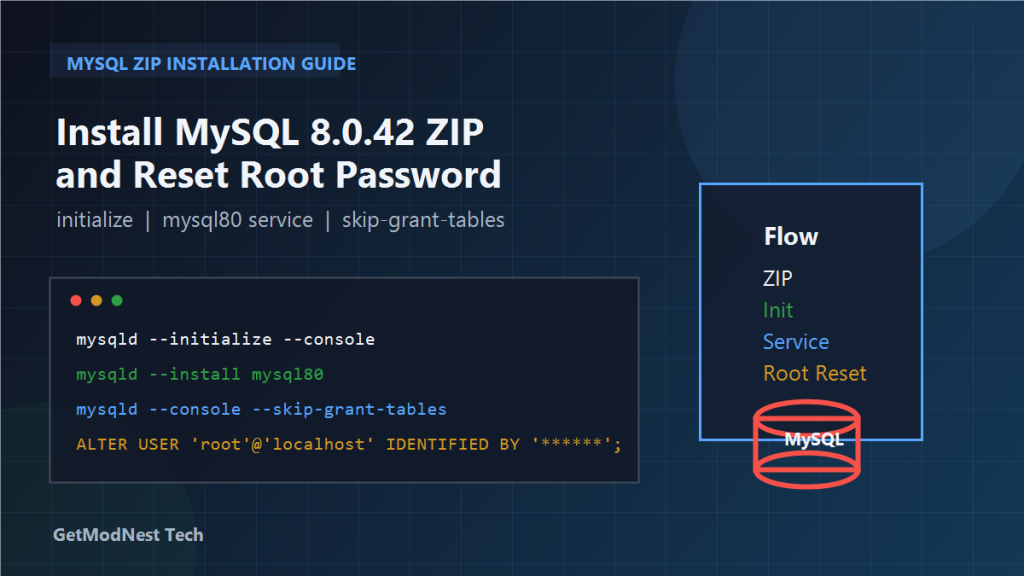
This article documents a hands-on process for installing MySQL 8.0.42 from the ZIP package on Windows, initializing the data directory, registering the Windows service, and resetting the root password.
Unlike the MSI installer, the ZIP package installation requires several manual steps, including initializing the database files, registering the MySQL service, and starting mysqld directly when password recovery is needed.
This process also includes the use of --skip-grant-tables to temporarily bypass authentication and set a new password for the root account.
Environment
- OS: Windows
- Database version: MySQL 8.0.42
- Installation package:
mysql-8.0.42-winx64.zip - Example installation directory:
D:\soft\mysql80 - MySQL binary directory:
D:\soft\mysql80\bin - MySQL service name:
mysql80
Scenario
The process covered two related goals:
- install and initialize MySQL 8.0.42 from the ZIP package on Windows
- reset the
rootpassword after the service had already been installed
Because the ZIP version is a manual installation format, the setup does not rely on the standard Windows installer workflow. That means initialization, service registration, and password recovery all need to be handled directly from the command line.
Step 1: Prepare the ZIP Installation
First, download the ZIP package:
mysql-8.0.42-winx64.zipThen extract it to a target directory such as:
D:\soft\mysql80This approach is different from the MSI installer because it does not automatically create the Windows service or initialize the data directory.
Step 2: Open the MySQL bin Directory
Enter the MySQL binary directory before running initialization commands:
cd D:\soft\mysql80\binAll later commands in this process are executed from this location unless stated otherwise.
Step 3: Initialize the Data Directory
Run the initialization command:
mysqld --initialize --consoleThis creates the initial system database files under the default data directory, for example:
D:\soft\mysql80\dataDuring initialization, MySQL also generates a temporary password for the root account.
That password is usually shown in the console output, so it should be recorded carefully if a normal first login is planned.
Step 4: Register the MySQL Windows Service
After initialization, register MySQL as a Windows service:
mysqld --install mysql80This creates a service named:
mysql80At this point, MySQL becomes manageable through standard Windows service commands.
Step 5: Verify the Service Registration
Check whether the service was registered correctly:
sc qc mysql80One of the important things to verify is the BINARY_PATH_NAME, which should point to the MySQL server executable under the extracted ZIP installation, for example:
D:\soft\mysql80\bin\mysqldIf this path is wrong, the service may fail to start or may be tied to the wrong MySQL installation.
Step 6: Start the MySQL Service
Start the service:
net start mysql80If everything is configured correctly, the service should start successfully.
At this stage, MySQL is installed and running.
Step 7: Stop the Service Before Password Recovery
To reset the root password, first stop the running MySQL service:
net stop mysql80This is necessary because the next step starts mysqld manually in recovery mode.
Step 8: Start MySQL with --skip-grant-tables
Start MySQL manually and disable privilege checking temporarily:
mysqld --console --skip-grant-tablesLeave this window open.
This temporary recovery mode allows connecting without normal password verification.
Step 9: Open Another Command Prompt and Log In
Open a second command prompt window and connect to MySQL as root:
mysql -u rootBecause --skip-grant-tables is active, MySQL should allow access without asking for the old password.
Step 10: Clear the Existing Root Authentication String
Inside MySQL, switch to the system database:
USE mysql;Then clear the existing authentication string for root:
UPDATE user SET authentication_string = NULL WHERE user = 'root';After that, apply the change:
FLUSH PRIVILEGES;Then exit:
EXIT;This removes the previous authentication value and prepares the account for setting a new password.
Step 11: Stop and Restart the Service Normally
After the temporary recovery session is complete, stop and restart the service normally.
Stop the service if needed:
net stop mysql80Then start it again:
net start mysql80This returns MySQL to standard authentication mode.
Step 12: Set a New Root Password
Now log in again:
mysql -u rootThen set a new password:
ALTER USER 'root'@'localhost' IDENTIFIED BY '123456';Apply the change:
FLUSH PRIVILEGES;After this, the new password should take effect.
Important Notes About This Recovery Flow
This process reflects a practical recovery sequence based on a ZIP-package installation.
A few points are especially important:
- the ZIP package does not behave like the full installer edition
- the service must be registered manually with
mysqld --install mysqld --initialize --consolecreates the system database files--skip-grant-tablesshould only be used temporarily and only for local recovery- after recovery, MySQL should always be restarted in normal mode
Troubleshooting Checklist
- Was the ZIP package extracted completely?
- Are you running commands from the correct
bindirectory? - Did
mysqld --initialize --consolefinish successfully? - Did the service registration command use the correct service name?
- Does
sc qc mysql80show the correct binary path? - Was the service stopped before starting
mysqld --skip-grant-tablesmanually? - Are you connecting from a second command prompt while the recovery instance is still running?
- Did you run
FLUSH PRIVILEGESafter changing authentication data? - Did you restart MySQL normally before issuing
ALTER USER?
Summary
The full process can be summarized as follows:
- extract
mysql-8.0.42-winx64.zip - enter
D:\soft\mysql80\bin - initialize MySQL with
mysqld --initialize --console - register the service with
mysqld --install mysql80 - verify the service path with
sc qc mysql80 - start the service with
net start mysql80 - stop the service for recovery
- run
mysqld --console --skip-grant-tables - connect with
mysql -u root - clear
authentication_string - restart the MySQL service normally
- log in again and run
ALTER USERto set the new password
The key lesson is that ZIP-based MySQL installation on Windows gives full control, but it also requires manual handling of initialization, service management, and account recovery steps.
Need Help with a Similar Problem or Project?
This note is based on a real troubleshooting, configuration, or development workflow. If you need help with databases, Linux servers, web applications, desktop software, iOS and Android apps, automation scripts, deployment, or AI development environments, GetModNest can provide practical technical support, troubleshooting, and development assistance.
Email: info@getmodnest.com