Overview
This article documents a practical BiomedParse V2 inference environment setup on Windows. The goal was to prepare a Python environment, install PyTorch with CUDA support, install Detectron2 and related dependencies, configure Hugging Face model downloads, organize configuration files and model weights, and finally run inference.py for batch inference.
The overall workflow is:
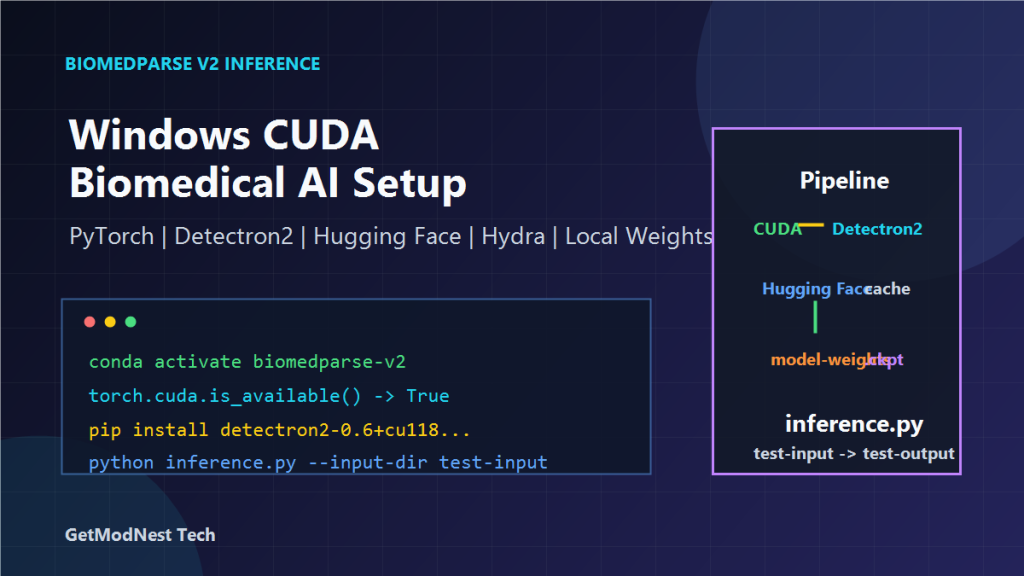
Windows + CUDA -> Conda environment -> PyTorch -> Detectron2 -> Transformers -> Hugging Face cache -> BiomedParse V2 model weights -> inference.pyBiomedParse is a biomedical image parsing model. In this setup, the key challenge was not only installing Python packages, but also making sure CUDA, Detectron2, model configuration files, and local checkpoint paths were all correctly aligned.
Goal
The recorded target was:
run BiomedParse V2 inference on a Windows CUDA environment
load a local model checkpoint
use inference.py to process images from an input folder
save output results into an output folder
avoid repeated online model downloads when possible
The main script was:
inference.pyThe expected command pattern was:
python inference.py --input-dir D:\biomedparse\test-input --output-dir D:\biomedparse\test-outputStep 1: Create a Conda Environment
Create a dedicated Conda environment for BiomedParse V2:
conda create -n biomedparse-v2 python=3.10Activate it:
conda activate biomedparse-v2Using a separate environment avoids dependency conflicts with other deep learning projects.
Step 2: Install PyTorch with CUDA
Install a CUDA-enabled PyTorch build.
Example command:
pip install torch torchvision torchaudio --index-url https://download.pytorch.org/whl/cu118After installation, verify CUDA availability:
python -c "import torch; print(torch.cuda.is_available())"Expected result:
TrueIf the result is False, check NVIDIA driver installation, CUDA compatibility, and whether the PyTorch package was installed with CUDA support.
Step 3: Install Detectron2
BiomedParse depends on Detectron2. On Windows, Detectron2 installation is often the most sensitive step because it must match Python, CUDA, PyTorch, and the available wheel build.
The notes mention using a prebuilt wheel such as:
pip install detectron2-0.6+cu118-cp310-cp310-win_amd64.whlThis kind of wheel should match:
Detectron2 version: 0.6
CUDA version: cu118
Python version: 3.10
Platform: win_amd64
After installation, collect environment information:
python -m detectron2.utils.collect_envThe output should confirm that Detectron2, PyTorch, and CUDA are compatible.
Step 4: Install Hydra, Transformers, and Other Dependencies
Install Hydra and Transformers dependencies:
pip install hydra-core==1.1.1
pip install transformers==4.30.2
Install common scientific and image-processing packages:
pip install numpy pandas scikit-image opencv-python tqdmThese packages are commonly required for preprocessing, model execution, image reading, and progress display.
Step 5: Configure Hugging Face Model Download
The notes mention Hugging Face model usage, including CLIP-related model files such as:
openai/clip-vit-base-patch32In some regions, direct Hugging Face access may be slow or unstable. A mirror endpoint can be configured:
set HF_ENDPOINT=https://hf-mirror.comThen run a model download script, for example:
python download-clip-cache.pyThe downloaded cache is usually stored under a user cache directory such as:
C:\Users\username\.cache\huggingface\transformersOnce the model is cached locally, repeated downloads can be avoided.
Step 6: Organize Project Files
The recorded project directory structure was similar to:
D:\BiomedParse
├─ configs
│  ├─ model
│  │  ├─ biomedparse.yaml
│  │  └─ biomedparse-3D.yaml
│  ├─ evaluate_biomedparse.yaml
│  └─ finetune_biomedparse.yaml
├─ src
│  └─ model
│     └─ biomedparse-3D.yaml
├─ inference.py
├─ model-weights
│  └─ biomedparse-3D_AllData_MultiView_edge.ckpt
├─ test-input
└─ test-output
Important files include:
inference.py                                      inference entry script
configs/model/biomedparse-3D.yaml                model configuration
src/model/biomedparse-3D.yaml                    model definition/config reference
model-weights/biomedparse-3D_AllData_MultiView_edge.ckpt   local checkpoint file
Keeping model weights under a clear model-weights directory makes path management easier.
Step 7: Fix the Configuration Name
One recorded configuration issue was related to the config name used in inference.py.
Original style:
cfg = compose(config_name="biomedparse-3D")The notes indicate changing it to a model config path such as:
cfg = compose(config_name="model/biomedparse-3D")This helps Hydra locate the correct YAML file under the configuration directory.
Step 8: Fix Model Initialization Problems
One recorded error was:
AttributeError: 'dict' object has no attribute 'load_pretrained'This usually means the code expects a configuration object with attributes, but the loaded object is a plain dictionary, or the model initialization path does not match the current configuration format.
Things to check:
Hydra config structure
model config YAML path
whether the expected model object is created
whether checkpoint loading code matches the config format
whether old and new BiomedParse config formats are mixed
For this type of error, review both inference.py and the model YAML file to confirm that the code and configuration use the same schema.
Step 9: Run Inference
After the environment, dependencies, model configuration, and checkpoint paths are ready, run inference:
python inference.py --input-dir D:\biomedparse\test-input --output-dir D:\biomedparse\test-outputThe script should read input images from:
D:\biomedparse\test-inputand write results to:
D:\biomedparse\test-outputIf the script runs successfully, it should use the local model weights and GPU for inference.
Current Status Checklist
The recorded status can be summarized as:
Conda environment: biomedparse-v2
CUDA: available
Detectron2: installed through a compatible wheel
Transformers: installed and able to load cached models
Hydra: installed
inference.py: runnable and able to access GPU
model weights: stored in model-weights directory
checkpoint: biomedparse-3D_AllData_MultiView_edge.ckpt
The key remaining risks are usually:
CUDA and Detectron2 version mismatch
wrong Hydra config path
missing or incorrect checkpoint path
Hugging Face model download failure
config object format mismatch
Common Problems
CUDA Is Not Available
Run:
python -c "import torch; print(torch.cuda.is_available())"If it returns False, check:
NVIDIA driver
PyTorch CUDA build
CUDA runtime compatibility
whether the correct Conda environment is active
Detectron2 Installation Fails
On Windows, install a wheel matching Python, CUDA, and PyTorch versions.
For example, a wheel name like this contains important compatibility information:
detectron2-0.6+cu118-cp310-cp310-win_amd64.whlMeaning:
cu118     CUDA 11.8
cp310     Python 3.10
win_amd64 Windows 64-bit
Hugging Face Download Is Slow or Fails
Configure a mirror endpoint:
set HF_ENDPOINT=https://hf-mirror.comThen download the model cache again.
You can also pre-download model files and keep them under the Hugging Face cache directory.
Hydra Cannot Find the Config
Check the config name in inference.py.
For nested config files, use a path like:
cfg = compose(config_name="model/biomedparse-3D")Also confirm that the file exists:
configs/model/biomedparse-3D.yamlCheckpoint Cannot Be Loaded
Check whether the checkpoint exists:
model-weights/biomedparse-3D_AllData_MultiView_edge.ckptAlso check whether the YAML file references the correct path.
AttributeError: dict object has no attribute load_pretrained
This indicates a mismatch between configuration loading and model initialization.
Check:
whether the model config is loaded as expected
whether the code expects attribute-style config access
whether OmegaConf or Hydra conversion changed the object type
whether the checkpoint loading function matches the model class
Practical Notes
Important lessons from this setup:
create a clean Conda environment first
install CUDA-enabled PyTorch before Detectron2
use a Detectron2 wheel that matches Python and CUDA
verify torch.cuda.is_available() early
cache Hugging Face models locally when network access is unstable
keep model weights in a predictable directory
fix Hydra config paths before debugging model code
run inference with explicit input and output directories
For Windows-based deep learning projects, version matching is usually more important than the code itself. Python version, PyTorch build, CUDA version, Detectron2 wheel, and model config files must all match.
Final Conclusion
This BiomedParse V2 setup records a practical Windows inference environment using CUDA, PyTorch, Detectron2, Transformers, Hydra, and local model weights.
The core process is:
create Conda environment
install CUDA-enabled PyTorch
install matching Detectron2 wheel
install Hydra and Transformers
configure Hugging Face cache
organize BiomedParse config files and weights
fix Hydra config path
run inference.py with input and output directories
Once these pieces are aligned, BiomedParse V2 can run local biomedical image inference using a GPU-backed Python environment.
Need Help with a Similar Problem or Project?
This note is based on a real troubleshooting, configuration, or development workflow. If you need help with databases, Linux servers, web applications, desktop software, iOS and Android apps, automation scripts, deployment, WordPress, or AI development environments, GetModNest can provide practical technical support, troubleshooting, and development assistance.
Email: info@getmodnest.com