Overview
This article walks through a MySQL 8.0 deployment on Linux using the official generic binary package, followed by server parameter tuning, full backup restore, asynchronous replication, and Keepalived-based VIP failover.
The target architecture is:
Application
  -> VIP managed by Keepalived
  -> Active MySQL primary
  -> MySQL replica for synchronization and failover readiness
The build uses MySQL 8.0.24 with a custom data directory, binary logging, row-based replication, native password authentication, and a read-only replica.
Environment
- Database: MySQL 8.0.24 generic Linux tar package
- Installation path:
/usr/local/mysql - Data path:
/data/mysql/data - Binary log path:
/data/mysql/binlog - Socket path:
/tmp/mysql.sock - Service manager:
systemd - MySQL port:
3306 - Primary server ID:
1 - Replica server ID:
2 - Replication user:
repl - Backup transfer method:
mysqldumpplusscp - Failover component: Keepalived VIP
Design Goals
- use a predictable binary installation path
- separate MySQL data and binary logs under
/data/mysql - keep character set consistent with
utf8mb4 - support older client compatibility with
mysql_native_password - allow high connection capacity with
max_connections - enable binary logging for replication and recovery
- keep the replica read-only during normal operation
- use Keepalived VIP for application-side database endpoint stability
Step 1: Extract and Install MySQL
tar -zxvf mysql-8.0.24-el7-x86_64.tar.gz
mv mysql-8.0.24-el7-x86_64 /usr/local/mysql
Create the MySQL group and user:
groupadd mysql
useradd -r -g mysql -s /sbin/nologin mysql
Set ownership:
chown -R mysql:mysql /usr/local/mysqlThe mysql operating system user runs the database process without interactive login access.
Step 2: Prepare Data and Binlog Directories
mkdir -p /data/mysql/{data,log,binlog}
chown -R mysql:mysql /data/mysql
Keeping data files and binary logs under /data/mysql makes the layout clear and easier to back up.
Step 3: Handle Runtime Library Compatibility
On some Linux systems, the MySQL binary package may require compatibility links for libncurses or libtinfo.
ln -s /lib64/libncurses.so.6 /lib64/libncurses.so.5
ln -s /lib64/libtinfo.so.6 /lib64/libtinfo.so.5
Only create these links if the MySQL binary reports missing shared libraries during startup or initialization.
Step 4: Configure the Primary Server
Create /etc/my.cnf on the primary server:
[mysqld]
basedir=/usr/local/mysql
datadir=/data/mysql/data
socket=/tmp/mysql.sock
pid-file=/data/mysql/mysql.pid
port=3306
bind-address=0.0.0.0
server-id=1
log-bin=/data/mysql/binlog/mysql-bin
binlog_format=ROW
max_connections=2000
character-set-server=utf8mb4
collation-server=utf8mb4_general_ci
lower_case_table_names=1
default_authentication_plugin=mysql_native_password
sql_require_primary_key=OFF
sql_mode=STRICT_TRANS_TABLES,ERROR_FOR_DIVISION_BY_ZERO,NO_ENGINE_SUBSTITUTION
default-time-zone='+08:00'

[client]
default-character-set=utf8mb4
socket=/tmp/mysql.sock
Important parameters:
server-id=1identifies the primary in replication.log-binenables binary logs for replication.binlog_format=ROWprovides safer row-level replication behavior.max_connections=2000supports a higher connection workload.lower_case_table_names=1avoids case-sensitive table name issues.default_authentication_plugin=mysql_native_passwordimproves compatibility with older clients.
Step 5: Initialize the Primary Database
/usr/local/mysql/bin/mysqld --defaults-file=/etc/my.cnf --initialize --user=mysqlIf an insecure initialization is preferred in a closed lab environment, the command can be:
/usr/local/mysql/bin/mysqld --initialize-insecure --user=mysql --datadir=/data/mysql/dataUse secure initialization for production environments.
Step 6: Create the systemd Service
Create /etc/systemd/system/mysqld.service:
[Unit]
Description=MySQL Server
After=network.target

[Service]
Type=forking
User=mysql
Group=mysql
ExecStart=/usr/local/mysql/bin/mysqld \
  --defaults-file=/etc/my.cnf \
  --daemonize \
  --pid-file=/data/mysql/mysql.pid
ExecStop=/usr/local/mysql/bin/mysqladmin \
  --defaults-file=/etc/my.cnf shutdown
PIDFile=/data/mysql/mysql.pid
LimitNOFILE=65535
TimeoutSec=600
Restart=on-failure

[Install]
WantedBy=multi-user.target
Reload systemd and start MySQL:
systemctl daemon-reload
systemctl enable mysqld
systemctl start mysqld
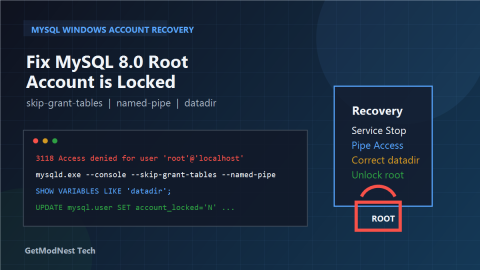
systemctl status mysqldStep 7: Reset Root Password and Open the Firewall
ALTER USER 'root'@'localhost' IDENTIFIED WITH mysql_native_password BY 'Bw-mysql-sW@2025';
FLUSH PRIVILEGES;
Open MySQL port 3306:
firewall-cmd --add-port=3306/tcp --permanent
firewall-cmd --reload
Step 8: Create Application and Replication Accounts
Create a service account for application access:
CREATE USER 'sw_user'@'%' IDENTIFIED BY 'Bw-mysql-sW@2025';
GRANT ALL PRIVILEGES ON *.* TO 'sw_user'@'%' WITH GRANT OPTION;
FLUSH PRIVILEGES;
Create a replication account for the replica:
CREATE USER 'repl'@'100.100.10.%' IDENTIFIED BY 'Passwd26';
GRANT REPLICATION SLAVE ON *.* TO 'repl'@'100.100.10.%';
FLUSH PRIVILEGES;
The replication user only needs replication privileges. Avoid using root for replication.
Step 9: Prepare the Replica Server
Install MySQL on the replica using the same binary layout.
[mysqld]
basedir=/usr/local/mysql
datadir=/data/mysql/data
socket=/tmp/mysql.sock
pid-file=/data/mysql/mysql.pid
port=3306
bind-address=0.0.0.0
server-id=2
log-bin=/data/mysql/binlog/mysql-bin
relay-log=/data/mysql/binlog/relay-bin
binlog_format=ROW
read_only=1
max_connections=2000
character-set-server=utf8mb4
collation-server=utf8mb4_general_ci
lower_case_table_names=1
default_authentication_plugin=mysql_native_password
sql_require_primary_key=OFF
sql_mode=STRICT_TRANS_TABLES,ERROR_FOR_DIVISION_BY_ZERO,NO_ENGINE_SUBSTITUTION
default-time-zone='+08:00'
Initialize and start the replica with the same systemd method.
Step 10: Take a Consistent Full Backup from the Primary
mysqldump -uroot -p \
  --single-transaction \
  --master-data=2 \
  --databases zy_fc_basic zy_fc_jx zy_fc_xxp zy_fc_zts testdb \
  > full-data.sql
Transfer the dump file to the replica:
scp full-data.sql root@100.100.10.85:/root/The --master-data=2 option writes the binary log file and position into the dump as a commented CHANGE MASTER TO line.
Step 11: Restore Data on the Replica
mysql -uroot -p < /root/full-data.sqlFind the binlog position in the dump:
grep "CHANGE MASTER TO" /root/full-data.sqlExample output:
-- CHANGE MASTER TO MASTER_LOG_FILE='mysql-bin.000036', MASTER_LOG_POS=501532416;Step 12: Configure Replication on the Replica
CHANGE MASTER TO
  MASTER_HOST='100.100.10.84',
  MASTER_USER='repl',
  MASTER_PASSWORD='Passwd26',
  MASTER_PORT=3306,
  MASTER_LOG_FILE='mysql-bin.000036',
  MASTER_LOG_POS=501532416;
Start replication:
START SLAVE;Check replication status:
SHOW SLAVE STATUS\GHealthy replication should show:
Slave_IO_Running: Yes
Slave_SQL_Running: Yes
Step 13: Test Synchronization
On the primary:
INSERT INTO testdb.t1 VALUES (3000, 'final-ok');On the replica:
SELECT * FROM testdb.t1;If replication is healthy, the inserted row appears on the replica.
Step 14: Add Keepalived VIP
Keepalived provides a virtual IP that applications can use as the database endpoint.
Application -> VIP -> active MySQL nodeWhen the active node becomes unavailable, Keepalived can move the VIP to the standby node. The application continues to use the same IP address and does not need to change its database connection string.
Typical Keepalived configuration includes a VRRP instance, priority values, a virtual IP address, a health check script for MySQL, and failover scripts if role switching is required.
A VIP move alone does not automatically promote a replica safely. Promotion logic should ensure replication is caught up and the new active node is writable before traffic is switched.
Operational Notes
Binary Logs
Binary logs are required for replication and are useful for point-in-time recovery.
Read-Only Replica
Keep read_only=1 on the replica during normal operation.
Root Access
Do not use root for application or replication connections.
Character Set
Use utf8mb4 consistently on both primary and replica.
Table Name Case
lower_case_table_names=1 should be decided before initialization.
Primary Key Policy
sql_require_primary_key=OFF allows legacy schemas without primary keys, but tables with primary keys replicate and recover more safely.
Troubleshooting Checklist
- Confirm MySQL starts with
/etc/my.cnf. - Confirm
/data/mysql/dataand/data/mysql/binlogare owned bymysql:mysql. - Confirm port
3306is open between primary and replica. - Confirm
server-idis different on each node. - Confirm binary logging is enabled on the primary.
- Confirm relay log path exists on the replica.
- Confirm the replication user can connect from the replica host.
- Confirm dump position matches
MASTER_LOG_FILEandMASTER_LOG_POS. - Confirm
Slave_IO_RunningandSlave_SQL_Runningare bothYes. - Confirm application traffic uses the VIP, not a physical node IP.
Final Conclusion
The MySQL 8.0 Linux deployment uses a controlled binary installation layout, custom data directories, systemd service management, and a parameter set aimed at compatibility and replication readiness.
The primary server enables binary logging with server-id=1. The replica uses server-id=2, relay logs, and read_only=1. A consistent mysqldump backup with binlog coordinates initializes the replica, and replication starts from the recorded position.
Keepalived adds a stable VIP entry point for applications. With proper health checks and role-control logic, this design provides a practical foundation for MySQL synchronization and controlled failover in a Linux environment.
Need Help with a Similar Problem or Project?
This note is based on a real troubleshooting, configuration, or development workflow. If you need help with databases, Linux servers, web applications, desktop software, iOS and Android apps, automation scripts, deployment, or AI development environments, GetModNest can provide practical technical support, troubleshooting, and development assistance.
Email: info@getmodnest.com